 |
| |
Tutorial - Making a map for Rogue Spear - Part 1
Before you start make sure you have:
1. 3d Studio Max version 2.5, or 3.0, or 3.1
2. A paint program like Paint Shop Pro or Photoshop. You can download a trial version of Paint Shop Pro.
Pre Building Work
Before you begin making the map, you will first have to setup the mod and gather some textures.
Making the mod files/folders
1. First you will have to make the mod folder in Rogue Spear\mods\. There are many files that go into the mod's folder, so the best way to see what they do is to download an example of a map. You can go into the files section on this site and download 'Italy: Training Facility'. Extract it to your Rogue Spear directory and you can look at the files. (You can skip this if you want because the next file you will download is almost a complete map mod)
Throughout this tutorial, I will be using a small zip with all the needed directories and files. This will be the complete mod of the map and everything that the tutorials tells you to do is already done. So you don't actually have to do all the file editing because it is all done for you. Use the tutorial to understand what the files do and as a guide for the future maps. I think it is the best way of learning because you have an example and an explanation of what it does and how it works. You can even run the map you will complete in this tutorial right after you unzip this file. Just make sure to use 1 or 2 terrorists in the custom mission because the map will crash with too many.
Download it here.
Open it using WinZip and press Extract (make sure you do not click on any files within the zip file before extracting because there are directories that will not be extracted). Extract it to your Rogue Spear\Mods\ folder.
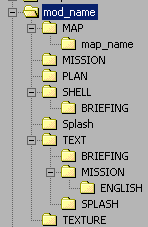
Now go to your mods directory and you should see a new mod called 'mod_name'. Ok, now you are ready for the 'good stuff'.
Textures
Find some textures, (look in this tutorial for a list.) The example map provided has some textures. Remember, the dimensions of the image must be 2^x (where 3 <= [[x]] <= 8) pixels, so a size like 128 x 128 pixels is standard (2^7 x 2^7). Size like 256 x 256 will give you a lot of detail and on the contrary 32x32 will give you a lot less. You can use many different combinations of sizes, like 128x64, 64x256, etc. Look in ROMMEL_EDITOR.HLP -> "General rules and building sizes" for a complete list of supported image sizes. The point of this is that if you use any other size like 120x90, it will still show up in the game, but it will become very blurry and also bmp's that are not the proper size will not be converted properly to RSB's. The idea you should remember is not to use all 256x256 textures, because they will require a lot more video card memory. A final map should have a total of less than 4 MB in RSB textures.
Making a texture
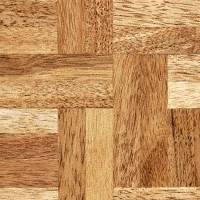
1. Ok, lets go to a site like this one: http://astronomy.swin.edu.au/pbourke/texture/woodtile/ and pick out a texture you like. Click on the texture, and it should tile in the background. Right click on the image and press copy (or save-picture as if you really want to, but it's not necessary).
Here is what I chose.
2. Open PSP and Paste the image (CTRL-V). I am using version 6.0 of PSP, so the new version might have some things different. Anyway, click on menu View->Image Information
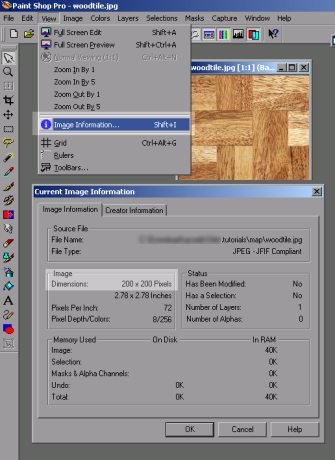
There you should see the dimensions of the image. The image I am using is 200 x 200, so the wise idea would be to reduce it to 128x128.
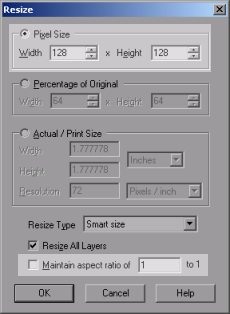
3. Close the image info window and press Resize from the Image menu. Uncheck 'Maintain aspect ratio of x.x to 1'. Click on 'Pixel Size' radio button and type width 128 and height 128. Click OK.
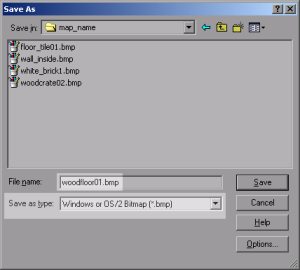
4. Now the image is the right dimensions. You can click on Image Info once again and check the new pixel size. It's now time to save, so click 'save as'. Go to your mod's directory (mod_name\map\map_name\) and save the image as 'woodfloor01.bmp'. (Make sure you make the file type a Windows Bitmap)
5. That is about it you have to know about textures. If you made them the proper size, they will be converted to RSB's by the light maker tool (later in the tutorial). You can do that manually, by going to save as and saving as a image as an RSB. To do this you will need this PSP plugin (rsbplugin.zip) The plugin is also needed to open and edit existing RSBs, so be sure to have the RSB plugins.
To set up the plugin:
1. Go to your PSP directory and make a new folder named 'plugins' if one does not exist.
2. Open the zip file with the plugin and extract RSBBitmap.8bi into you plugins directory in PSP.
3. Start PSP. Press File->Preferences->General Program Preferences. Click on the 'Plug-in Filers' tab. Add the folder Plugins in your PSP directory. The window and settings should look like this:
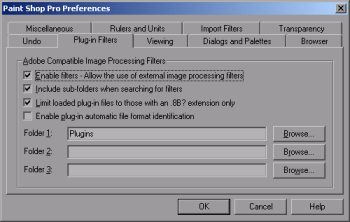
Press Ok and restart the program. Now you should be able to save an image with the file format 'RSBitmap (*.rsb)'
You can also use a program to convert a large number of BMP's to RSB's. Get rsbbmp.zip here.
Part 2 >>> If you are not reading the tutorial, save me the bandwidth because the next 5 pages all look the same and there is no magic there except pure knowledge.
|
|
|
|
|
|