 |
| |
Tutorial - Making a map for Rogue Spear - Part 2
3d Studio Max
Yes, the moment has arrived to make the map. This will go through making some simple rooms, which will allow you to make anything from large office buildings to outdoor areas. So, this should be enough info to make almost any map.
1. Start 3d Studio Max. I am assuming you have the map plugins and they are properly installed and setup. If you did not do that yet, read this prerequisite tutorial.
2. Before making a map, you normally have to make a scene center block and a shermanlevel. These might be a bit confusing to a beginner mapper, so I created a max files with those elements already there and also a simple room.
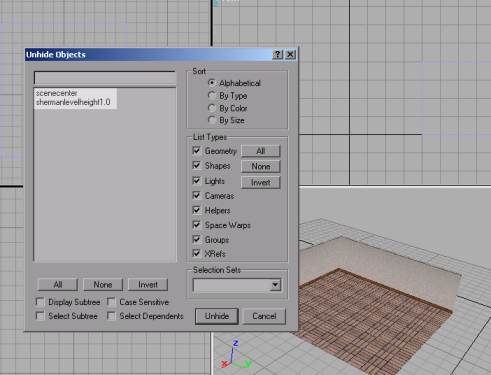
3. Open map1(1 room).max from mod_name\map\map_name\. (The other max files are the same map, but after you build the second room) When it loads look at the single room. Move around and look at the textures. Now press '5' key to look at the hidden objects. You will see on the list scenecenter and shermanlevel1.0. You can unhide those and look at them. To hide them again, click on them and press Edit -> Properties and check 'Hide'.
Making a Room
1. Ok, lets start off by making a second room right next to this one. Make sure you have 'Snap to Grid' On. Select all 3 snap to grid buttons in the lower left-middle (under perspective) of the screen.
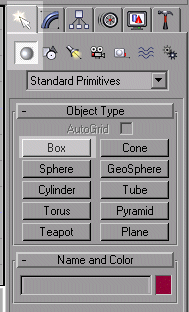
Press the Box tool
And draw a long room right next to room 01. Leave 200 cm between the rooms. It should look something like this:

The height of the room is 400, which is a bit too high for a house, but good for an office building. I made the actual room a bit smaller then pictured in the image above.
2. Now we will have to flip the faces so they are facing inward. Press Modify Tab, Press Normal (if it's not there press More or Sets and look for it there) and check 'flip normal'

The room should look like this now.

3. Now, we will have to name the box a room, so on top rename the box01 to RoomWallsR02_01

4. Now, we will break apart the room into 6 sections (4 walls, floor, and ceiling). Press Modify, Edit Mesh, Move down the menu until you find a button named explode. (This is only in 3dsmax 3.x, so if you have v2.5, you will have to detach every face)

Press Explode and a small new window should show up. For object name, paste the name of your room 'RoomWallsR02_01' and delete the '01' from the name. Press OK.

This will make six objects called RoomWallsR02_01 to RoomWallsR02_06.
5. Click on the View objects icon to see all the objects in the max scene.

Next, click on the floor polygon and add an F at the end of the name, so its now called (for example: RoomWallsR02_02F)

Do the same for the ceiling polygon and add a C at the end of the name.
6. Now we will have to tag the floor polygon as a 'floorface' so the characters will be able to walk on it. (If you do not tag it as floorface, there will be no way to walk on it) Select the floor polygon and press Open Track View button, then the Hammer icon, then Open Rommel Editor
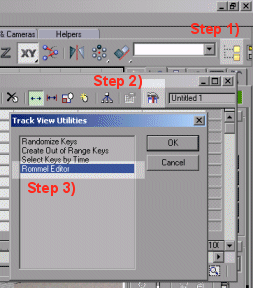
With the Track View window open (you can minimize it, but it must stay open) and the floor polygon selected, check the "floor polygon" in the Rommel editor.

Now close the Rommel Editor and Track view. With the floor polygon selected, press Edit -> Properties. Click on the User Defined Tab and you should see in the text box the word floorface.

From now on, when ever you make a floor of a room, crate, outside field, etc. just select that polygon and press Edit -> Properties ->User Defined Tab and type floorface. Press OK.
7. So now a person can walk in that room. Normally, I might texture this room at this point, however lets make a hallway right now so you get more practice with making the geometry. So, it's time to connect room01 and room 02.
Part 3 >>>
|
|
|
|
|
|